brainpan

10354092_10152260725527712_8901077227845494865_nBased on some Tibetan gore art I looked over recently.brains

All watercolor, brush and ink. 22×30″ on 300# kilimanjaro coldpress.

Yeah it’s warped (drying) in these images.

not for sale, made as a gift for a friend.

might make prints before I give it away, I haven’t decided yet.

PRINTS AVAILABLE HERE!

click through for more process shots and a full view of the finished piece.

.

.

.

. (more…)

painting as work and play/the dichotomy of the studio

Originally published on 12/23/2008.

20062641819191On painting…

You must have music which is entirely familiar to you playing. Any new thoughts or sounds may intrude upon your own particular vision, worming their way in, showing themselves. You want to have something so familiar that even the unconcsious ignores it. Something with beat that you can waggle the brush to. Something that makes you dance at your work.

You must have no unfamiliar or new scents in the studio. Only the familiar, the comfortable, the usual. Turpentine, coffee, tea. The things that your mind sees as backdrop, not as important, nothing that your mind must process or worry over. Nothing to bring up memories, which will also invade the vision. The mind as blank screen. No alarm bells, either for good or bad.

(more…)

summer hare!

watercolor painting of brown hare

Progress photos after the jump.

This is the second in a series of four paintings.

Gel medium to transfer drawings and sketches, DIY

So I got a huge tub of soft gel medium, and immediately decided I wanted to put some of the drawings I’ve been doing (mostly figure studies) onto some cedar planks I had. I searched for a how-to, and could only find people discussing photocopies, printed photos.

Nobody seemed to be interested in putting their own drawings onto other surfaces- or if they were, they were willing to photocopy them first.

I wasn’t interested in that- I wanted to draw the piece on paper myself, in reverse, and then transfer it right to the wood.

I read up about the way gel medium works. If you’re using something that soaks into the paper, it won’t transfer. You need to be using something that sits on the surface of the paper, like prismas on tracing paper, or like inks on copy paper, or dry paints.

(more…)

hobo how-to, makin an old-timey drawing

Here’s an old timey post for you guys. Tattoo artists that like old-timey stuff will recognize some of the in-jokes here that others might not- I kind of wrote it for you guys as a joke anyway, but these directions WILL work…so enjoy. You can actually buy prints of this guy here, YES PLEASE FUCKING BUY ONE I AM A FUCKING BROKE HOBO.

How to make an extremely old-timey picture

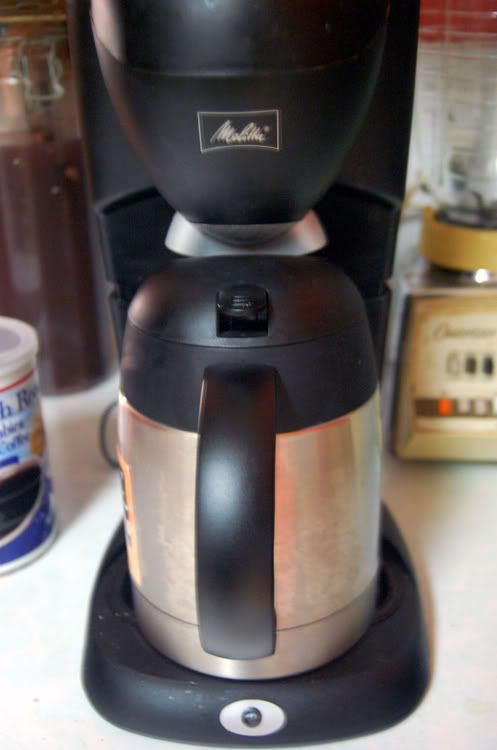
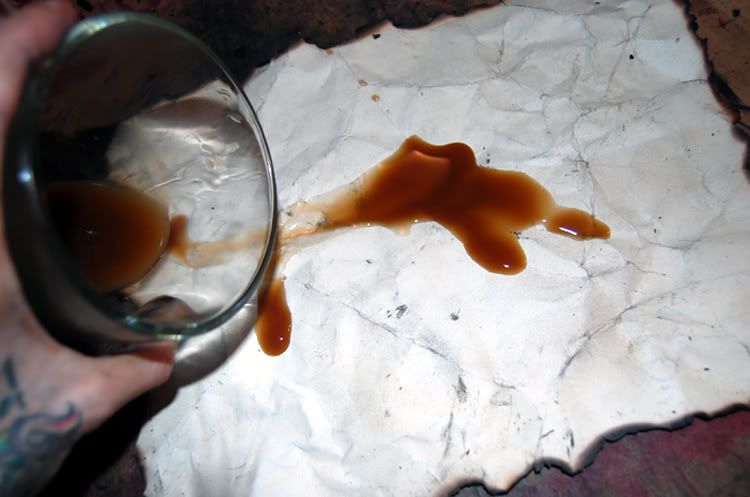
1.First, You have to brew coffee.

Good strong coffee.

The kind your grandpa would make at a hobo camp.

Coffee that will put hair on your chest.

Shit your sister would never drink.

The kind of coffee that people see in the glass and look confused about.

Brew your coffee first and brew it strong,

Not only will it keep you alert throughout this process, and taste better with whiskey in it,

but we’re going to use it as a dye.

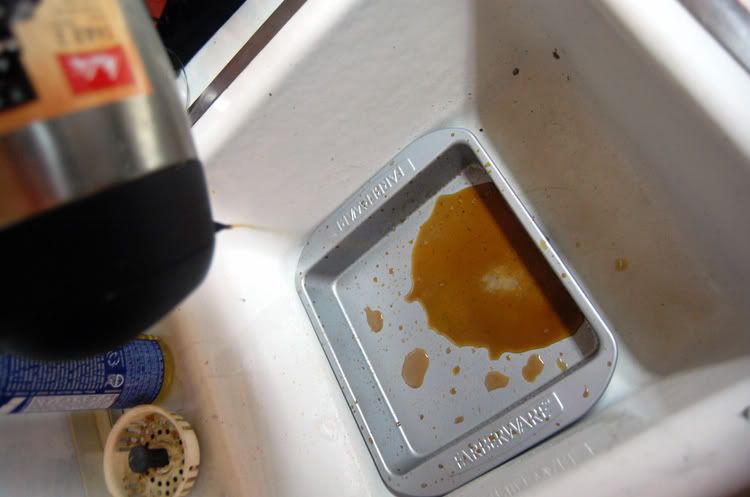
2. Then, pour into a tray. Soak some cardstock or watercolor paper in the coffee,
crumpling it and savaging it at random, if you are in a foul mood. or just soak it flat if you feel pretty amiable.

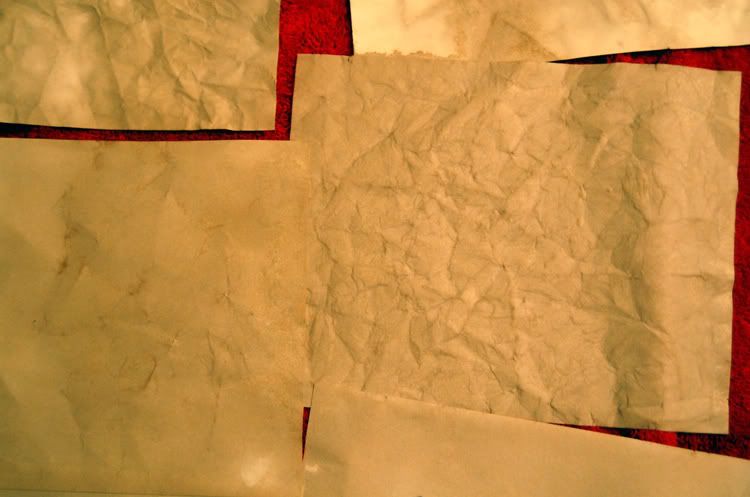
3.Lay the paper out on a towel or other handy surface, to dry out a bit. You want the paper to be just about totally dry when you start working with it. Not damp, just chilly. You’ll notice that the crumpled scapegoat paper looks kind of cool.

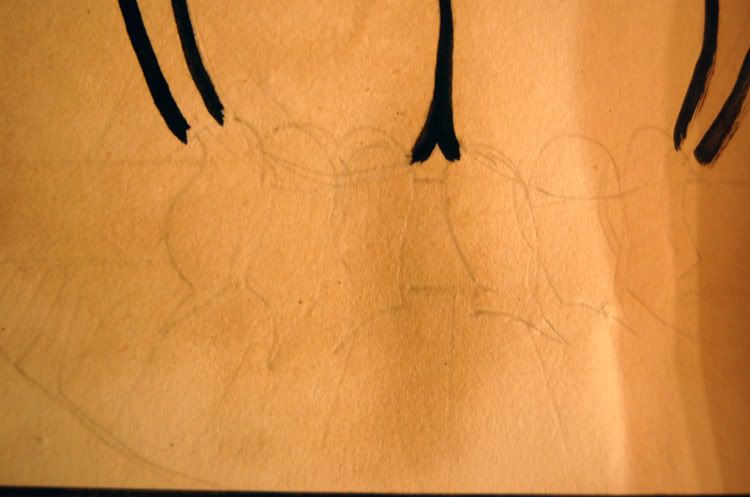
4.Next find yourself some reference, or using your brain and its own images, start drawing in light pencil on the paper. I used a 6h pencil so it would be very faint.

If you use a hard pencil don’t get too angry at the paper.

You’ll rip it to bits.

If you’re using a softer pencil go ahead and be a jerk to it.
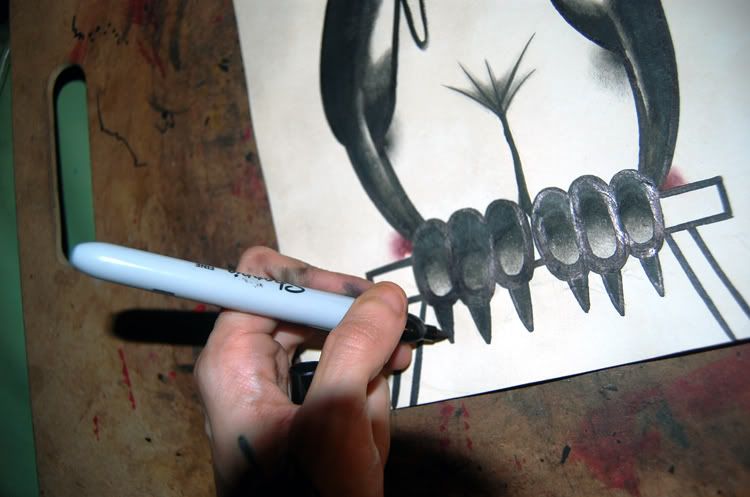
Then take a small soft filbert brush, dip it into black waterfproof ink, and draw some more.

Right over all the pencil marks.

I use either FW or higgins ink, for this.

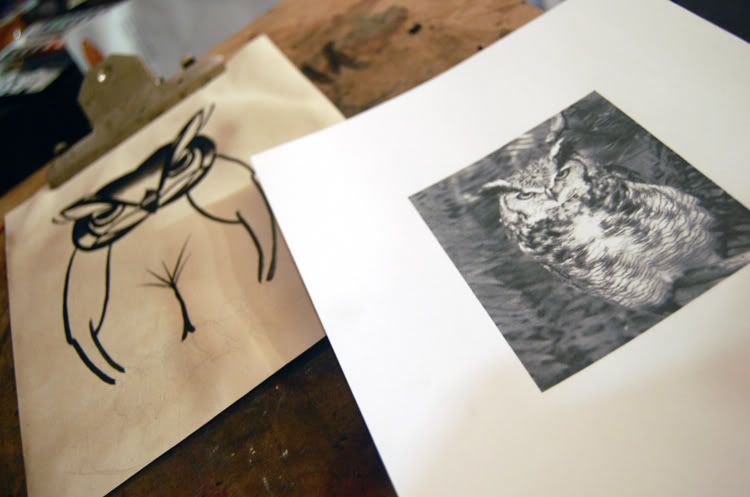
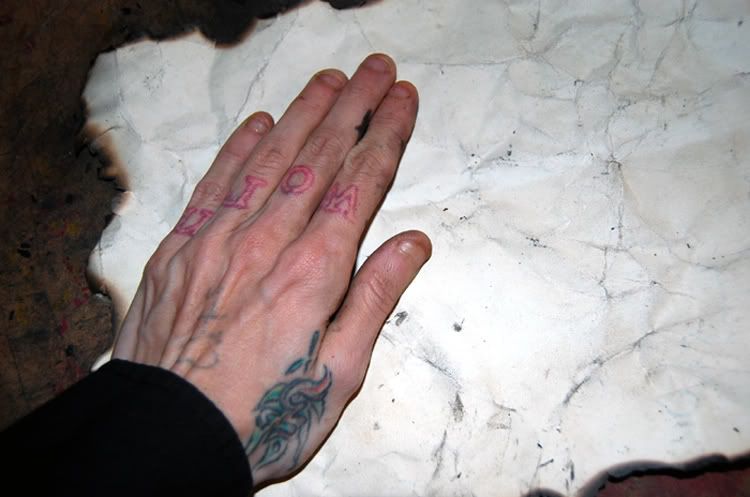
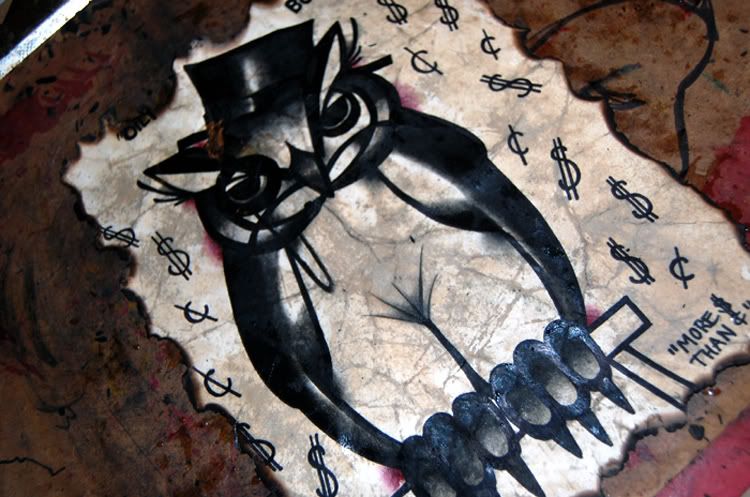
5.I have used reference for my hooter picture. Whatever you are drawing, remember that you only have a few minutes before the yard bulls show up and stick ya in the pokey, so hurry the fuck up.
Keep it extremely simple.

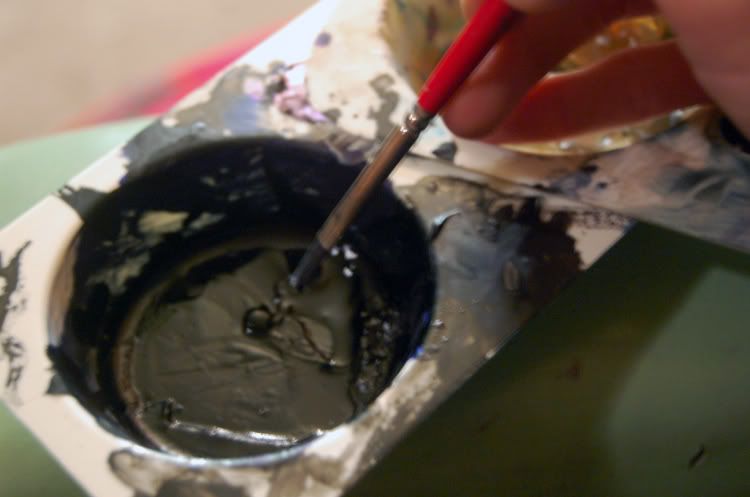
6.I mean real simple. You can use watercolor black from the tube. Or you can use some liquid watercolors.

Or you can use kid’s paint, dry watercolors, although those are a pain in the ass. I suppose you can also use sharpie or prismacolor with alcohol on the brush, too, but those dry really fast, too fast for me to do old timey stuff with them. They do have the benefit of using up your whiskey spit.

Here is my ink and brush- as you can see, my brush is flattened and curly? That’s because I’m too lazy to clean them up right away, so they sit in the water til they dry out weird and curly. Don’t do that.

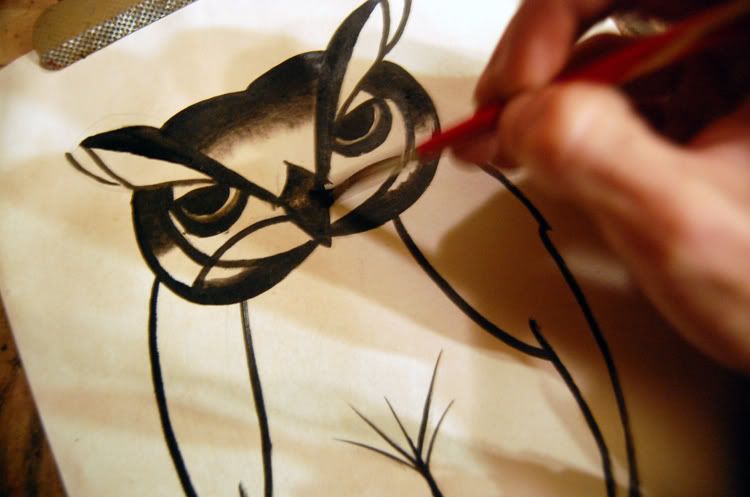
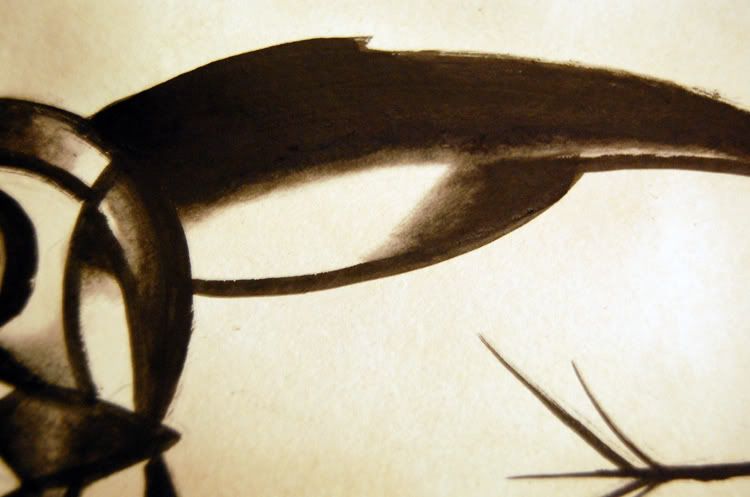
7.I usually lay in the darkest areas first, then come back through with a dry brush and smooth out the edges, then with a only very slightly damp brush I moisten the edges of that again, making it blend. it doesn’t take long and you don’t need water- it’s easier to use a damp sweaty hand or your spit to do it. if you are drinking your coffee like you should be then your hands will be nice and sweaty by now. I know a lot of people will have the unbearable urge to wet the paper then paint onto it, like you’re supposed to use watercolors.

WE’RE NOT DOING THINGS THAT WAY IN HERE, GO BACK TO WETCANVAS FORUMS.

8.At this point, just crank up the music and keep going. you wanna
keep it minimal.

Suggested music would include baby gramps, tom waits (early works, or like bone-machine)
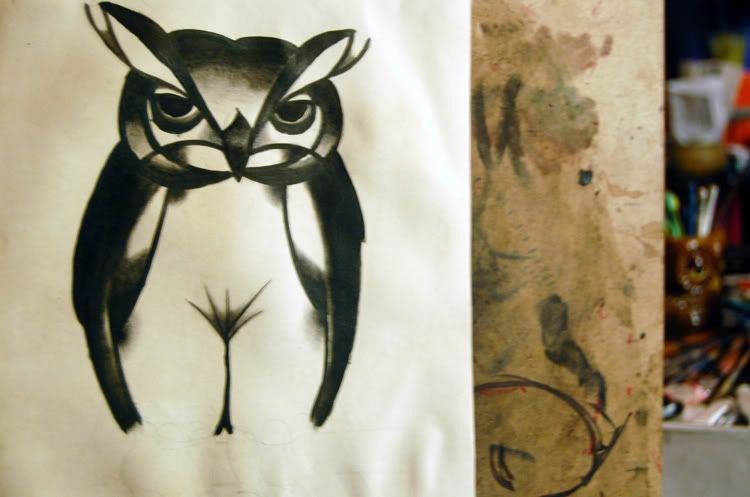
I actually think I did way too much on this one, way more shading and fucking around than I should have.

The simpler, the smoother, the less work, the better with this stuff.

If you mess up somewhere, just find a way to hide it with more black.

That’s what it’s there for, right? I guess if I was truly old timey I’d be using lampblack soot, dirt, and saliva  to make the picture.

I try to get pretty close, anyway.

Eventually, you will come to believe you are finished, or the yard goat’s light will pick you out, and you’ll have to stop with the feverish sweating and blending.

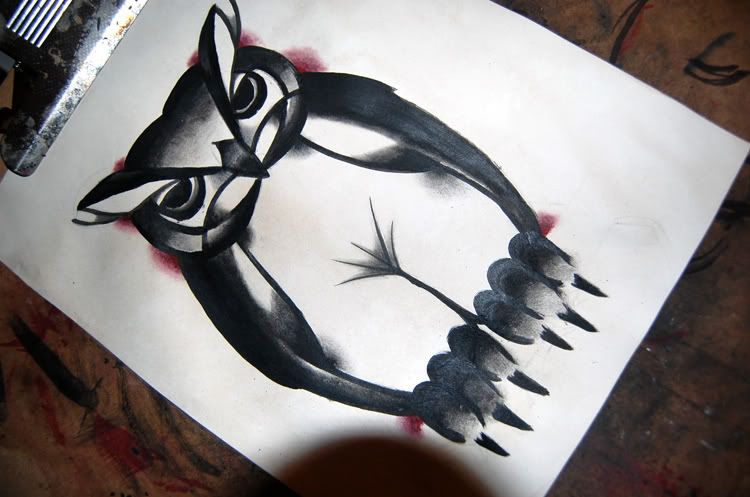
9.Now, since you’ve come so far, finish out any little things you got confused about,or forgot to do, while you were blending.

Like his fucking feet and the perch.

Everything will probably look a little rough and shitty at this point. It helps when doing this kind of artwork to make sure your lighting is inadequate, and that you have someone sitting near you drinking and exclaiming at random intervals,
and that you work on a shitty piece of uneven wood, or at least a stained old clipboard precariously balanced
on your knees.

Markers are only considered cheating if you do them with your right hand.

roughed out

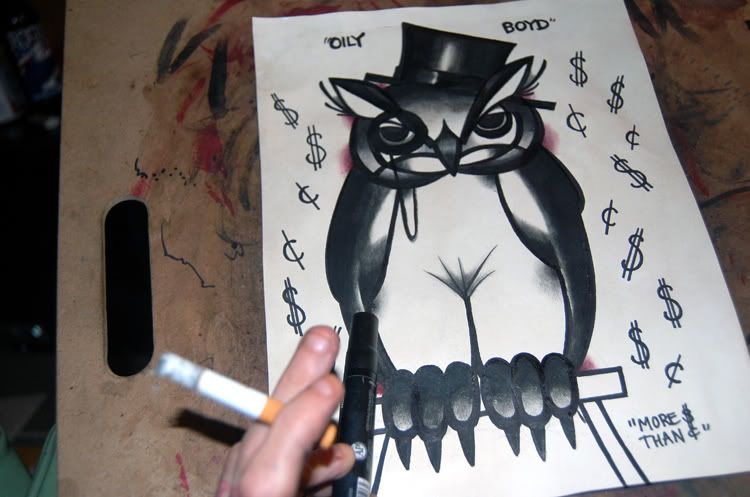
10.Now if you want to be schmancy, you can pick a few spots and put a color in it. One color. What do you think this is, art school?
One color only. Remember, you’re a bindlestiff, a wayfarer, a gandy…you ain’t got no room for paint pots in that sack, kiddo. One color. It’s not even 1940 yet, so simmer down.

I like to use red everytime. Feel free to use green, yellow, or brown if you prefer.

No blue, no purple, definitely no hot pink- you’re in the wrong place to get fancy.

Put a dot where you think the darkest red should be.

11.Do this for every place red will go.Then use the almost all the way-dry brush you’ve been chewing on, to blend them out. I like to make the areas of color into little half-circles.

12.Wow, that’s come along pretty far. Looks nice and clean. At this point I usually would put on a monocle and top hat.

No matter what you are drawing, just go ahead and do it,
trust me, monocle and top hat.

Man, if you can give it a cigarette in a long holder, even better.

The closer you get to the monopoly guy, the better.

You want the art to be classy, goddamnit.

If you can’t do a monocle and top hat, whatever you do, DON’T ADD A MUSTACHE-

This is old timey, not HIP.

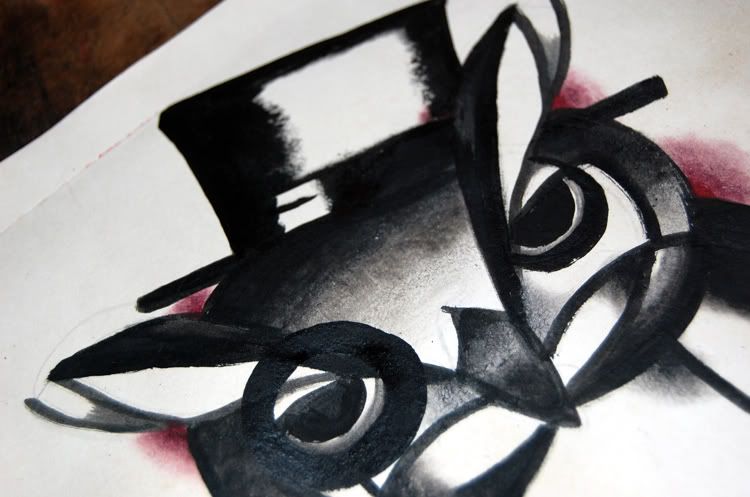
13.At this point, get out a thin liner brush, or a permanent black non-water soluble marker,and clean up the edges of the black and all the lines.

Now if you want to be a dick you can add a bunch of crap around it. This one looks like a capitalist pig owl to me, so I’m giving him a name and a joke.

It’s a shitty joke, I know.

No really. I know.

You will be tempted to draw blood, or if you are a tattoo”er” some raindrops, around the object. Resist this temptation!!!
Your picture should be a combination of items that is humorous to you, and you alone.

that means no unicorns, no mustaches, no ironic shit.

Nothing that popular modern culture would enjoy

(says the one painting an owl in a top hat)

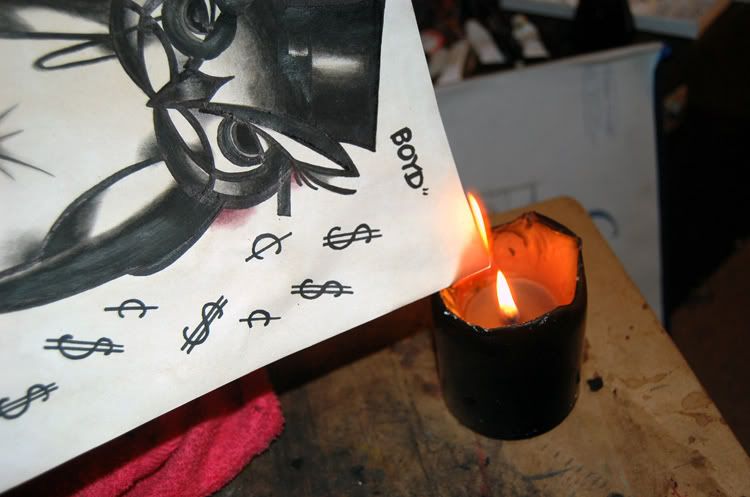
14.Now get a damp, really damp rag, and a candle, and set that shit on fire!

15.The rag is for putting out the fire, so that you only burn the parts
of your page that seem useless to you, or where it would look cool to have a singe.

You need the rag.

I should make it very clear that if you’re kind of half-assedly following the instructions and didn’t bother to get a damp rag you might be kind of fucked right now,

because you set your shiny new art on fire.

That’ll teach you to follow instructions.

16.Bet you like it so far, huh?
Think you did a good job?
That’s some kinda cool picture?

BULLSHIT, IT’S GARBAGE!
THROW IT THE FUCK AWAY!
YOU SAD SACK OF SHIT,
YOU CAN’T DRAW!!!

UGH SERIOUSLY YOU SUCK!

JUST CRUMPLE THAT WASTE OF TIME INTO A BALL AND THROW IT AT A POKEY OR A COP!

IT’S NO GOOD FOR ANYTHING ELSE!

Damn, I was just kidding!
Sheesh, man, try to have a thicker skin!
Why you gotta be so worried
about what I think, anyway? flatten that
thing out again, let me get a closer look.

Go easy on it. I mean it’s still kind of-

oops oh shit hey I’m sorry-

Hey waittaminute…ok

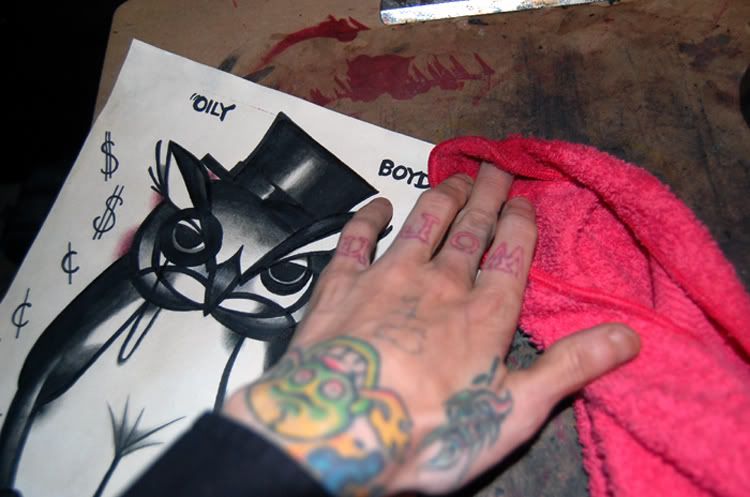
dry that crap off with the rag. the burny rag.

You really needed that rag.

17. Crumple it up, flatten it out,
spill coffee all over the back of it,
and let it soak for a few. Don’t do this
until ALL the paint has dried completely.
That looks right out of a hobo museum.

Good show, sir, good show.

Originally Published on: Nov 12, 2007

poly clay pipe bowl, process summary one.

I’ve been doodling schematics to build an e-pipe out of an old wooden pipe I have (which has its own long story, too) and decided that I needed a bowl to play around with- maybe two, or three. In reading up on traditional pipe woods, and researching blank pipe blocks and such, I came to the realization that I have a little pile of perfectly-beautiful rootstock driftwood with awesome grain…but I don’t want to start with something difficult. I want to test my schematics, and get some practice in with figuring out placements, sizes, and specs before I pour time into a piece.

CAM02683[1]

So I am using poly clay to map out my ideas. Since there will be no fire, no burning, and the bowl of the pipe will not be in anyone’s mouth- it’s perfectly safe to use as a pipe for vaping (PV style- I don’t smoke pot so I have no clue about the temperatures for that, or if poly clay would work, so you’re on your own, potheads.)

I’m using liquid acrylics to make the ivory clay different tones. This first time I’m more concerned with getting the size right and the shape and stuff, or as close to ok as possible, than with prettiness, so I am just using a couple browns I like and aiming for a kind of general pale woodgrain thing.

Here you can see, poly clay, warmed up and kneaded, and two colors of liquid acrylic ink. On top of my schematic sketches.

After getting my clay warm and ready, I broke it up into a few balls. Then I added some color to one-

CAM02685[1]Just enough to tone it brown, warm. And then kneaded it in (I do not have any tools for working clay, I do it by hand and then work over the baked pieces with a dremel) You have to knead it in until there are no bubbles, and no more “pockets” of ink or paint in it. It shouldn’t really be homogenously colored, for what I’m doing, so I just worked it in until it was pretty well the same consistency throughout.

I’m using Waverly acrylics here- Bill makes amazing tattoo inks for professionals, and also has this sideline of making incredible paints.

His brown is incredibly intense on paper. Here, it ends up very diluted.

My hands get really gross from this paint.

You have to get poopy hands to do this stuff properly. If you wear gloves, you’re cheating and your stuff will come out ugly. I swear it.

CAM02686[1]I did the same for a nice antelope brown, it’s a sort of olive green/yellowish amber color that is hard to pin down.

It’s another one of my favorites for painting, FW makes very fluid inks and paints.

I used a bit more of this color and more clay in this color, I really like it.

To be noted: I now have moldy, poopy hands.

If you want more color saturation, you can use tube acrylics, or even oil paints or pigments. Just make sure that the clay stays elastic, bendy. If it starts to fall apart, you’re watering it down too much with paint. You want the clay to be able to set up strong and hard, not crumbly or brittle.

I ended up adding about three rounds of ink. I just squeeze some out onto the blob, knead it in and spread it around the surface. I try not to trap any liquid or any air inside the blob either, bubbles will bake to the surface later and wreck the finish.

At this point the clay is really warm and goopy.

I did a third ball of amber tone brown, I won’t show that one as it is pretty boring to see pictures of a poopy, exorcist-pukey, moldy hand.

yes, that's an old 510 battery as a mini rolling pin.

yes, that’s an old 510 battery as a mini rolling pin.

Now you roll out all three balls into flat pieces. I make them about an eighth of an inch thick at this point. I don’t want the colors to get muddied or blend together too much.

I’m also being lazy.

Roll out all three, then make a sandwich of them. I put the greenish brown in the middle and the creamy amber on top. It doesn’t matter much though, because once you stack them? pat them til they meld together a little, then roll THAT out into a thinner piece.

I did this once. again- lazy.

.

.

.

CAM02693[1]CAM02694[1]Take a break for some iced tea.

Now, I took a baggie. I put some black ink on top of my sandwich of clay, then folded it in half and put it in the bag. Then I rolled it out again. Then I folded it over.

Then I rolled it out again. I kind of did this a few times at random angles, trying to get the black to make layers.

I did this only until I felt like the pattern was sort of woodsy (that word. I love anything woodsy)

By this point everything is covered in poopy mold and pea soup. It’s awesome. Sometimes a mess is what you need. I had kind of a rough day, I couldn’t sleep last night, I’m waiting on someone I did a commission for to let me know they got my email, and I am broker than usual…which is always depressing.

So this messy clay is therapeutic.

CAM02695[1]

CAM02697[1]Now I took whatever was handy (a pen) and mushed the clay layers around into each other, poking dents into the clay, making little hashmarks and stuff. I find that if you do this in an organic pattern- not perfect or symmetrical, but simply balanced in randomness with some repeating elementsthen it looks more like wood.

I’ve made wood-grain clay before, and it came out better than this will, because I was more concerned with the graininess that time.

Then I get out my one-dollar cure-all shank knife, and slice the ragged edges off.

I used the little bits left over to plug up the depressions and dents.

This kind of makes “knots” if you do it right. I didn’t do it quite right.

Then roll it out one last time, and check it- it looks like MEATWOOD!

seriously. meat, wood.

seriously. meat, wood.

CAM02700[1]CAM02702[1]Now I can start to shape the bowl. Finally. I made the rolled out clay a little too thin this time. I think I should have made it maybe twice as thick as I wanted the bowl to end up, the walls of the bowl. But I made it only a little thicker, so I ended up making the bowl thinner-walled than I’d wanted. I kept lining it up with my to-scale sketch, to make sure I wasn’t making anything the wrong size for the hardware I’ll be putting in later.

I even tucked the tank wize I will be using on it, into the stem to check. I did however forget to account for shrinkage- polyclay shrinks a bit when you bake it.

But there’s a simple fix for that- I can just kind of ream out the stem (shank?) when I get to the dremel stages, and make a little more room- or use a little bit of epoxy in there to hold something tightly in the shank.

.

CAM02703[1]

I got pretty close to the right size and shape.

,

double checking stuff against my very precise planning sketch.

double checking stuff against my very precise planning sketch.

oh man, that bowl is crooked. I'll mess with it some more.

oh man, that bowl is crooked. I’ll mess with it some more.

Now that I’ve got things sort of situated, I get a sheet of aluminum foil out, big enough to make a tent all around the pipe. It shouldn’t touch the clay at all, or it’ll singe it. I packed all the holes with coffee filters torn and mushed to the right supporting shape, and put a folded bit of filter under the base of the pipe, between the pipe and the foil.

Then I stuck it in the oven at 275 and waited about forty five minutes.
Then I yanked it out fast and dunked it into very cold water for about five minutes.
Then I wiped it off and took more photos.
The next step after this is the dremel, rasps, files, and sanding. I will probably buff a mild shine on the surface but I don’t like the glassy look too much so I may tone that down. Or even engrave with the dremel a nice testure to match the “grain” of the wood. I think it came out pretty well for a first attempt at this, and tomorrow I’ll post either the second attempt, or the pictures of this being worked over and finished out.
I’ll probably have to add a third post to show the wiring and stuff I’m planning; but I will cross that bridge when I come to it. For now, I have a nice unfinished “wood” clay pipe to work with.

Sorry for the dark photos, I will get awesome bright daytime ones tomorrow, I promise.
CAM02706[1]CAM02707[1]CAM02708[1]CAM02709[1]

“dwelling portably, formerly known as Message Post, Sept, 2001-2005”

Printed originally in “dwelling portably, formerly known as Message Post, Sept, 2001-2005”

A tightly-printed little stapled zine, Dwelling Portably was printed in Philomath OR. I have three or four issues of it, and it would be almost two novels’ worth of typing to get them posted online in their entirety. This zine is CRAMMED with text, tiny tiny text. I’ll try to get the more interesting snippets up.

“”about Chaz’s hobo castle and Ozark land,

I don’t recommend building around campers. Building around something is much more difficult, and the result is not a new building because this old thing is in there. Better to start from scratch and, if you do a good job, you will have something worthwhile when you’re done. If I was doing it again, I would build a straw-bale house.

I now have a far better toilet system, inspired by Joe Jenkins’ Humanure Handbook. I now cover with sawdust, then compost. If done properly, the heat will kill all pathogens, and, in two years, I’ll be able to use the compost directly on my garden. Eastwind Community has successfully used this system for several years, and fertilize their extensive organic gardens. I helped collect one day.

(more…)

is your art good enough to sell online?

Short answer? Yes.

Long, realistic answer?

pretty on the inside

I show you my heart.

Putting your art up online is kind of like showing it in a gallery. You may not be the best at your particular art style, but if you want to improve, showing the internet what you are doing is a good way to get better. There are so many skill levels, so many ways of expressing yourself; the internet is home to them all.

If you’re really timid, start slow. Use deviantart, and request critiques. Once you feel like you can handle more harsh views, try some art forums, and ask for opinions.

Or, alternately, you can dive right in. We all start where we are. Try to get very good pictures of your work. never upload giant files; upload files that are just big enough to look good on a monitor, no larger. Image theft is common, and sometimes unintentional. If you watermark unobtrusively, and only upload smaller files, you’ll find more people credit you when reposting or sharing your work. You want people to do that, because that is how you will sell your art online.

Etsy is a good starter for artists. It’s not the best venue for fine art, but it can be a good way to get your feet wet. Be cautious, though, as most of the advice on using etsy is not written with art in mind, but easily-reproducible craft. Your painting can’t be tagged and posted the same way a t-shirt can. This is why etsy is only a starter site.

The Craftstar has a decent art section, but you will have to have a paypal and pay for listing in advance.

You could also opt for one of the other sites geared for art sales- originals are harder to sell most places than prints, but it IS possible to sell just originals online.

If you are just starting out, keep your prices as low as possible. Once you are selling your work on a regular basis, then you can raise your prices. At first, it’s unknown if you will succeed or not. Most people not only buy art for its look, for how it grabs the eye, but also for the artist’s longevity, their name, their history. Build your history a little!

It’s the internet. You should maintain privacy for your own comfort and safety of course-but letting people get to know you, talking about deep or personal things, lets the viewer understand the origin of your works, and become more invested in them. Give them a chance to find out where the art came from. You can be a cantankerous bitch hermit like me and STILL be capable of showing your inner self online. You don’t have to be outgoing to do it; you can talk as if the site was your own art journal, your own notes about each piece.

So- yeah. Your art is good enough to sell online- at etsy or anywhere else. Keep your expectations of sales low at first, and your prices the same, and then as time passes you will see how your work can fit into the greater whole of online art.

And if you need encouragement, ask for it. And if you need a slap on the wrist, or a sound drubbing, you should ask for that too. All the help you could ever want from other artists lives inside your computer, but it can only do you good if you put your own work in there too.

home tattooing, round 13,879

http://resonanteye.net/2012/01/06/on-learning-to-tattoo/


Needlestick injuries, are also a consideration.

The risks associated with home tattooing start with minor Staph infections and end with septicemia (which can be fatal) and transmission of serious, life-threatening viruses. Also, using your home as a tattoo studio puts you and your family at extreme risk of infections and diseases. Simply put, this is not safe, and is most likely against the law.

Learning on your own will not allow you the ability to use modern techniques and equipment, since most retailers will not sell professional-grade equipment to amateurs. Despite what you may have read on the internet, there are NO books that will teach you everything you need to know to be a tattoo artist. These will only give you bits of information, and without good, working equipment and true, complete information, you just can’t tattoo all that well.

If you’re planning on doing this for fun, don’t bother. It is an actual, honest-to-god, real-life career, and should be approached as one.

naked mole rat process round two!

I woke up this morning with absolutely no knowledge about casts, molds, or anything

like that.

I had a stoneclay nakedmolerat, and a dream.
I also got: pam cooking spray, sculptamold, a jug of water, the oven on at 250 degrees, a fan, and the mole rat.I got: silicone caulk, glycerin, acrylic paint, a plastic spoon, a few bowls.


I also got aluminum foil, a towel to scrub my hands off, and a few extra things to scrape and mix with.

I mixed a bit of glycerin with a squirt of acrylic paint in a bowl, then added a TON of the silicone. I mixed it til it was consistent throughout, then sprayed my hands with pam and got them greasy, then I picked up the entire lump of silicone, and wrapped the mole rat in it, about 1/2″ thick.

I also made a silicone mold of  a monkey face toy, a cat and dog and rabbit face toy, all which happened to be 0n the table I was working next to.

the silicone set FAST. like, within twenty minutes it was solid. I cut a slit slong the back, and pulled out the mole rat.

it had made a perfect mold of him!

I mixed up sculptamold. the package says one-to-one with water, but that was too wet. I just kneaded enough water into it for it to be like dough. and then pressed it into the mold of the mole rat, filling it completely.

I let it stand for a bit, then put it into the oven at 200 degrees.


when I pulled it out, it came out of the mold easily…

the mole rats I made this way are very rough, the surfaces are really bumpy and uneven. I might sand them down a little bit tomorrow.

I’ve begun painting the smoother ones and the original I’d made the mold from. Part three of this epic project saga will be online late tomorrow night.

« Newer -- Older »

This is a unique website which will require a more modern browser to work!

Please upgrade today!