I’ve been doodling schematics to build an e-pipe out of an old wooden pipe I have (which has its own long story, too) and decided that I needed a bowl to play around with- maybe two, or three. In reading up on traditional pipe woods, and researching blank pipe blocks and such, I came to the realization that I have a little pile of perfectly-beautiful rootstock driftwood with awesome grain…but I don’t want to start with something difficult. I want to test my schematics, and get some practice in with figuring out placements, sizes, and specs before I pour time into a piece.
![CAM02683[1]](http://resonanteye.files.wordpress.com/2013/09/cam026831.jpg?w=300)
So I am using poly clay to map out my ideas. Since there will be no fire, no burning, and the bowl of the pipe will not be in anyone’s mouth- it’s perfectly safe to use as a pipe for vaping (PV style- I don’t smoke pot so I have no clue about the temperatures for that, or if poly clay would work, so you’re on your own, potheads.)
I’m using liquid acrylics to make the ivory clay different tones. This first time I’m more concerned with getting the size right and the shape and stuff, or as close to ok as possible, than with prettiness, so I am just using a couple browns I like and aiming for a kind of general pale woodgrain thing.
Here you can see, poly clay, warmed up and kneaded, and two colors of liquid acrylic ink. On top of my schematic sketches.
After getting my clay warm and ready, I broke it up into a few balls. Then I added some color to one-
![CAM02685[1]](http://resonanteye.files.wordpress.com/2013/09/cam026851.jpg?w=225) Just enough to tone it brown, warm. And then kneaded it in (I do not have any tools for working clay, I do it by hand and then work over the baked pieces with a dremel) You have to knead it in until there are no bubbles, and no more “pockets” of ink or paint in it. It shouldn’t really be homogenously colored, for what I’m doing, so I just worked it in until it was pretty well the same consistency throughout.
Just enough to tone it brown, warm. And then kneaded it in (I do not have any tools for working clay, I do it by hand and then work over the baked pieces with a dremel) You have to knead it in until there are no bubbles, and no more “pockets” of ink or paint in it. It shouldn’t really be homogenously colored, for what I’m doing, so I just worked it in until it was pretty well the same consistency throughout.
I’m using Waverly acrylics here- Bill makes amazing tattoo inks for professionals, and also has this sideline of making incredible paints.
His brown is incredibly intense on paper. Here, it ends up very diluted.
My hands get really gross from this paint.
You have to get poopy hands to do this stuff properly. If you wear gloves, you’re cheating and your stuff will come out ugly. I swear it.
![CAM02686[1]](http://resonanteye.files.wordpress.com/2013/09/cam026861.jpg?w=225) I did the same for a nice antelope brown, it’s a sort of olive green/yellowish amber color that is hard to pin down.
I did the same for a nice antelope brown, it’s a sort of olive green/yellowish amber color that is hard to pin down.
It’s another one of my favorites for painting, FW makes very fluid inks and paints.
I used a bit more of this color and more clay in this color, I really like it.
To be noted: I now have moldy, poopy hands.
If you want more color saturation, you can use tube acrylics, or even oil paints or pigments. Just make sure that the clay stays elastic, bendy. If it starts to fall apart, you’re watering it down too much with paint. You want the clay to be able to set up strong and hard, not crumbly or brittle.
I ended up adding about three rounds of ink. I just squeeze some out onto the blob, knead it in and spread it around the surface. I try not to trap any liquid or any air inside the blob either, bubbles will bake to the surface later and wreck the finish.
At this point the clay is really warm and goopy.
I did a third ball of amber tone brown, I won’t show that one as it is pretty boring to see pictures of a poopy, exorcist-pukey, moldy hand.
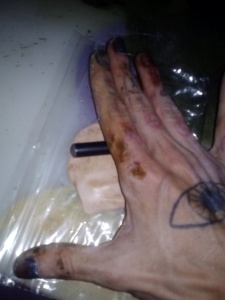
yes, that’s an old 510 battery as a mini rolling pin.
Now you roll out all three balls into flat pieces. I make them about an eighth of an inch thick at this point. I don’t want the colors to get muddied or blend together too much.
I’m also being lazy.
Roll out all three, then make a sandwich of them. I put the greenish brown in the middle and the creamy amber on top. It doesn’t matter much though, because once you stack them? pat them til they meld together a little, then roll THAT out into a thinner piece.
I did this once. again- lazy.
.
.
.
![CAM02693[1]](http://resonanteye.files.wordpress.com/2013/09/cam026931.jpg?w=225)
![CAM02694[1]](http://resonanteye.files.wordpress.com/2013/09/cam026941.jpg?w=225) Take a break for some iced tea.
Take a break for some iced tea.
Now, I took a baggie. I put some black ink on top of my sandwich of clay, then folded it in half and put it in the bag. Then I rolled it out again. Then I folded it over.
Then I rolled it out again. I kind of did this a few times at random angles, trying to get the black to make layers.
I did this only until I felt like the pattern was sort of woodsy (that word. I love anything woodsy)
By this point everything is covered in poopy mold and pea soup. It’s awesome. Sometimes a mess is what you need. I had kind of a rough day, I couldn’t sleep last night, I’m waiting on someone I did a commission for to let me know they got my email, and I am broker than usual…which is always depressing.
So this messy clay is therapeutic.
![CAM02695[1]](http://resonanteye.files.wordpress.com/2013/09/cam026951.jpg?w=225)
![CAM02697[1]](http://resonanteye.files.wordpress.com/2013/09/cam026971.jpg?w=300) Now I took whatever was handy (a pen) and mushed the clay layers around into each other, poking dents into the clay, making little hashmarks and stuff. I find that if you do this in an organic pattern- not perfect or symmetrical, but simply balanced in randomness with some repeating elements, then it looks more like wood.
Now I took whatever was handy (a pen) and mushed the clay layers around into each other, poking dents into the clay, making little hashmarks and stuff. I find that if you do this in an organic pattern- not perfect or symmetrical, but simply balanced in randomness with some repeating elements, then it looks more like wood.
I’ve made wood-grain clay before, and it came out better than this will, because I was more concerned with the graininess that time.
Then I get out my one-dollar cure-all shank knife, and slice the ragged edges off.
I used the little bits left over to plug up the depressions and dents.
This kind of makes “knots” if you do it right. I didn’t do it quite right.
Then roll it out one last time, and check it- it looks like MEATWOOD!
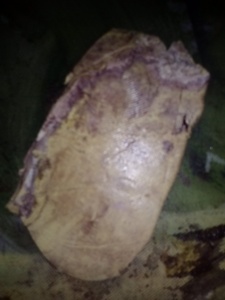
seriously. meat, wood.
![CAM02700[1]](http://resonanteye.files.wordpress.com/2013/09/cam027001.jpg?w=225)
![CAM02702[1]](http://resonanteye.files.wordpress.com/2013/09/cam027021.jpg?w=225) Now I can start to shape the bowl. Finally. I made the rolled out clay a little too thin this time. I think I should have made it maybe twice as thick as I wanted the bowl to end up, the walls of the bowl. But I made it only a little thicker, so I ended up making the bowl thinner-walled than I’d wanted. I kept lining it up with my to-scale sketch, to make sure I wasn’t making anything the wrong size for the hardware I’ll be putting in later.
Now I can start to shape the bowl. Finally. I made the rolled out clay a little too thin this time. I think I should have made it maybe twice as thick as I wanted the bowl to end up, the walls of the bowl. But I made it only a little thicker, so I ended up making the bowl thinner-walled than I’d wanted. I kept lining it up with my to-scale sketch, to make sure I wasn’t making anything the wrong size for the hardware I’ll be putting in later.
I even tucked the tank wize I will be using on it, into the stem to check. I did however forget to account for shrinkage- polyclay shrinks a bit when you bake it.
But there’s a simple fix for that- I can just kind of ream out the stem (shank?) when I get to the dremel stages, and make a little more room- or use a little bit of epoxy in there to hold something tightly in the shank.
.
![CAM02703[1]](http://resonanteye.files.wordpress.com/2013/09/cam027031.jpg?w=225)
I got pretty close to the right size and shape.
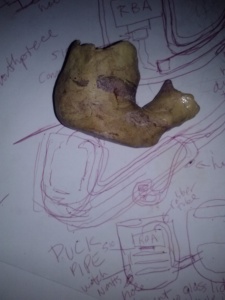
double checking stuff against my very precise planning sketch.
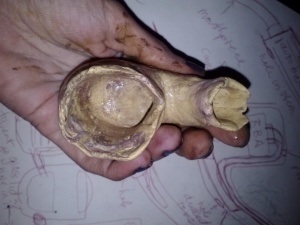
oh man, that bowl is crooked. I’ll mess with it some more.
Now that I’ve got things sort of situated, I get a sheet of aluminum foil out, big enough to make a tent all around the pipe. It shouldn’t touch the clay at all, or it’ll singe it. I packed all the holes with coffee filters torn and mushed to the right supporting shape, and put a folded bit of filter under the base of the pipe, between the pipe and the foil.
Then I stuck it in the oven at 275 and waited about forty five minutes.
Then I yanked it out fast and dunked it into very cold water for about five minutes.
Then I wiped it off and took more photos.
The next step after this is the dremel, rasps, files, and sanding. I will probably buff a mild shine on the surface but I don’t like the glassy look too much so I may tone that down. Or even engrave with the dremel a nice testure to match the “grain” of the wood. I think it came out pretty well for a first attempt at this, and tomorrow I’ll post either the second attempt, or the pictures of this being worked over and finished out.
I’ll probably have to add a third post to show the wiring and stuff I’m planning; but I will cross that bridge when I come to it. For now, I have a nice unfinished “wood” clay pipe to work with.
Sorry for the dark photos, I will get awesome bright daytime ones tomorrow, I promise.
![CAM02706[1]](http://resonanteye.files.wordpress.com/2013/09/cam027061.jpg?w=225)
![CAM02707[1]](http://resonanteye.files.wordpress.com/2013/09/cam027071.jpg?w=300)
![CAM02708[1]](http://resonanteye.files.wordpress.com/2013/09/cam027081.jpg?w=300)
![CAM02709[1]](http://resonanteye.files.wordpress.com/2013/09/cam027091.jpg?w=225)
 Yes, I made a gift guide. There’s a few hundred things there by now! I know SO many creative and amazing people- and every year I buy from them instead of going to big box stores. Why? Well, partly because I enjoy owning things made by hand, by people on their own time. And partly because I hated every factory job I ever had. If you’ve ever worked in a factory you know- you may do the job itself well or with some pride, but you do NOT put love into each and every piece of your piece rate. Especially since you get paid peanuts, made to work holidays away from your family, and -unless you have a GREAT union- every single thing you make is like a nail in your coffin, hurting your back, blistering your fingers. Also, handmade goods, the money you spend on them goes right back into YOUR economy, not to some CEO’s offshore hoarding pile of money. The money you spend on handmade gets spent, right back into the world.
 So I got a huge tub of soft gel medium, and immediately decided I wanted to put some of the drawings I’ve been doing (mostly figure studies) onto some cedar planks I had. I searched for a how-to, and could only find people discussing photocopies, printed photos.
![CAM02716[1]](http://resonanteye.files.wordpress.com/2013/09/cam027161.jpg)
![CAM02685[1]](http://resonanteye.files.wordpress.com/2013/09/cam026851.jpg)
![CAM02686[1]](http://resonanteye.files.wordpress.com/2013/09/cam026861.jpg)

![CAM02693[1]](http://resonanteye.files.wordpress.com/2013/09/cam026931.jpg)
![CAM02694[1]](http://resonanteye.files.wordpress.com/2013/09/cam026941.jpg)
![CAM02695[1]](http://resonanteye.files.wordpress.com/2013/09/cam026951.jpg)
![CAM02697[1]](http://resonanteye.files.wordpress.com/2013/09/cam026971.jpg)

![CAM02700[1]](http://resonanteye.files.wordpress.com/2013/09/cam027001.jpg)
![CAM02703[1]](http://resonanteye.files.wordpress.com/2013/09/cam027031.jpg)


![CAM02706[1]](http://resonanteye.files.wordpress.com/2013/09/cam027061.jpg)
![CAM02707[1]](http://resonanteye.files.wordpress.com/2013/09/cam027071.jpg)
![CAM02708[1]](http://resonanteye.files.wordpress.com/2013/09/cam027081.jpg)
![CAM02709[1]](http://resonanteye.files.wordpress.com/2013/09/cam027091.jpg)


